Thursday, August 9, 2012

Bullseye Cheesecake


Bullseye Cheesecake
Source: Maida Heatter's Cakes (Andrews & McMeel Publishing, 2011 ed.), pg. 132.


This is one of Maida Heatter's most famous recipes. The size of the pan is important - it must be a one-piece 8 x 3 pan.  

The only area where I strayed from Maida's instructions was for the crust. She says to pat the crumbs onto the cheesecake after it has baked. I have tried this before and it is messy and the crust is not as good. So, I used my basic recipe for a cheesecake crust and made it in the pan before adding the batter.

32 oz. cream cheese (Use Philadelphia brand - others do not all work the same - preferably at room temperature)
1/4 cup sour cream
1 tsp. vanilla extract
1/4 tsp. almond extract
1/4 tsp. salt
4 eggs
2/3 cup granulated sugar
2/3 cup dark brown sugar, firmly packed
1 tsp. powdered (not granular) instant coffee
2 tsp. unsweetened cocoa powder

For the crust:
About 1/4 cup graham cracker crumbs or crumbs made from Amaretti or any other crisp cookies (to be used after the cake has baked) (OR use this recipe instead)

Adjust a rack 1/3 from the bottom of the oven and preheat to 350. Butter an 8x3 inch one-piece cheesecake pan all the way to the rim. You will also need a larger pan to make a water bath. Set aside.

Beat the cream cheese until it is soft and smooth (it should be at room temperature).


Beat in the sour cream.

Add the almond and vanilla extract.

Add the salt.

Add the eggs, one at a time, scraping the bowl as necessary to insure that the mixture is smooth.
Remove the bowl from the mixer stand and divide the mixture into 2 bowls - you will have about 3 cups each.
Add the regular sugar to one bowl...
Add the brown sugar to the other bowl.

Stir in the sugar with a rubber spatula until it has dissolved. Do the same for the other bowl as well.
To the dark mixture, add the instant coffee and the cocoa. Stir.
You will now pour the batter into the pan in 4 separate additions. Pour half of one mixture (it does not matter which you start with) into the buttered pan.
Now pour half of the other mixture in the center.
The second mixture will expand but will stop before it reaches the edge. Really cool, right?


Add the remaining portion of the first mixture you used, again right in the center.

Add the remaining portion of the last mixture. See the bullseye forming...

Carefully place the pan into the larger pan and pour in the hot water - about 1 1/2 inches deep. If you are using an aluminum pan, add 1 tsp. cream of tartar to prevent the pan from discoloring. Transfer to the oven and bake for 1 1/4 to 1 1/2 hours.
Remove from the pan by inverting it on a flat board or pan. Maida's instructions for the crust require you to pat the crumbs onto the cheesecake with it upside down. To me, this is messy and too much trouble. I just pre-baked the crust and it was fine (see my introductory notes).


Monday, August 6, 2012

Strawberry Tart


Strawberry Tart
Source: Maida Heatter's Pies & Tarts (Andrews & McMeel Publishing, 1997 ed.), pg.101.

I think this is the first tart I've ever made a tart. The pastry wasn't bad at all and easy to work with and the strawberry gelatin mixture is also simple. It is a bit time consuming but you can always make the tart shell ahead of time.

First, prepare the French Tart Pastry (this can be done ahead of time). 

Preheat the oven to 375.

Flour the dough ball lightly.
Maida recommends rolling the dough on a pastry cloth. I did not have one so I used a cutting board. Flour the board and rolling pin and roll the pastry into a 12-inch circle.
You can see mine is not perfectly round. As long it is large enough to cover your pan, you are good.
Carefully roll the dough up over the rolling pin.
Position the rolling pin over your pan and carefully unroll it so that the pastry falls into the pan.
Gently push the pastry down into the pan and up the sides. If the dough comes apart, press it back together. If you have pastry that hangs over the sides, either cut it off or fold it over and press into the pastry on the sides of the pan.
If desired, you can form a fluted edge or designs around the rim. I didn't do this and kept it plain!
Place the pastry shell on a cookie sheet and freeze it (15 minutes should be sufficient). (If you are leaving it in the freezer for more than a few hours, wrap it in plastic wrap.) Line the frozen shell with aluminum foil and fill it with dried beans or pie weights. I had neither and used BB pellets. Why there were BB pellets in the kitchen drawer remains a mystery!
Bake the shell for 15-20 minutes. Remove from the oven and carefully the foil and pie weights. Return the shell to the oven and bake an additional 10-15 minutes until it is thoroughly dry and slightly browned. The pastry will shrink away from the sides. If you see the pastry puff up in places after removing the foil, prick it with a fork.
(Note: You may want to wait and remove it from the pan after the strawberries have been added and after it has chilled. I did it beforehand and had no problems) Removing the shell from the pan: Find a bowl or anything with a flat bottom that is smaller than the bottom of the flan pan. Sit the pan on top of the bowl and carefully ease the bottom portion of the pan off.

Now take a flat spatula or something similar to carefully run underneath the pie shell to loosen it from the pan (the shell popped right off for me).
Carefully transfer the shell to your serving plate. The shell is rather hard and easy to work with. I was afraid that it would shatter to pieces but this was not the case.


Filling

2 or 3 pint boxes (2 or 3 lbs.) fresh strawberries
1 cup granulated sugar
1/8 tsp. salt
2 tsp. unflavored gelatin
1/2 cup plus 1 TBS. water
1 TBS. lemon juice
3 TBS. corn starch


In a blender, puree 1 box of the berries to make 2 cups puree.
Strain the puree and place it in a heavy saucepan. Add the sugar and salt.
Sprinkle the gelatin over 2 tablespoons of the water and let it stand.
To the remaining 1/2 cup plus 1 tablespoon of water, add the lemon juice.
Add the cornstarch and stir to dissolve.
Add the lemon juice and the cornstarch mixture to the berries.
Over medium heat, stir constantly with a rubber spatula for about 6-7 minutes until the mixture comes to a low boil, thickens, and becomes slightly clear.
Reduce the heat to low and add the gelatin and stir to dissolve. Continue to cook and stir gently for 3 more minutes.
Transfer the mixture to a large bowl to cool.
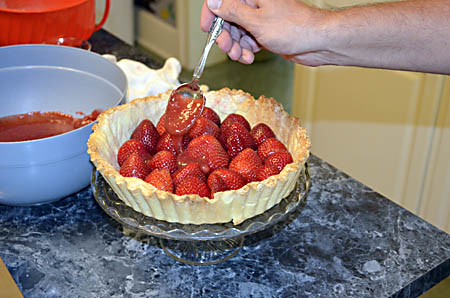
Place the berries in the baked shell. You can do this a variety of ways. You can stand them up whole or slice them and arrange them in a pattern.
Spoon the cooled gelatin over the strawberries and in between.
Refrigerate the tart for a few hours.

Whipped Cream Topping

2 cups heavy cream
1/4 cup granulated or confectioners sugar
1 tsp. vanilla extract

In a chilled bowl with chilled beaters, whip all the ingredients until the cream holds a soft shape (but not stiff).

The cream can be served alongside the tart. I used it for a garnish instead.


French Tart Pastry

French Tart Pastry
Source: Maida Heatter's Pies & Tarts (Andrews & McMeel Publishing, 1997 ed.), pg. 88.

This is very easy to make. It is also a very smooth and beautiful dough.

In the book, there are directions for 3 different ways to make it: in a food processor, in an electric mixer and by hand. I did it in my food processor.

1 3/4 unsifted all-purpose flour (stir to aerate before measuring)
2 TBS. granulated sugar
1/4 tsp. salt
4 oz. (1 stick) unsalted butter, cold and firm, cut into small pieces
1 cold egg
1 TBS. ice water

Fit the bowl with a metal blade. Put the flour, sugar, salt and butter in the bowl.
Pulse on and off for about 10 seconds until the mixture resembles coarse meal.
Place the egg and water in a small bowl and beat to mix.
Pour the egg and water mixture into the food tube slowly, processing about 20 seconds, until the mixture barely holds together.
Turn the mixture out on an un-floured surface. Using a small amount of flour, knead briefly, just a few seconds, until the dough is smooth and holds together. Form it into a ball. The dough can be used immediately or, if the room is warm or the dough has been handled too much, refrigerate for only an hour or less. It is now ready to use!

Tuesday, July 31, 2012

Blueberry Ice Cream


Blueberry Ice Cream
Source: Maida Heatter's Cakes (Andrews & McMeel Publishing, 2011 ed.), pg. 305.

Have you noticed that I like ice cream? It is my favorite dessert and I love it anytime of the year. Since I generally limit myself to sugar only on weekends and special occasions, I've been making ice cream a lot lately. My favorite ice cream to purchase is Ben & Jerry's and I've had to force myself to not buy their ice cream recipe book. I'm afraid I wouldn't be able to control myself.

So far, I have not met a Maida Heatter ice cream that I have not liked. My favorites are the chocolates but occasionally I go out on a limb and try something different. She has some rather interesting sounding ones, like Gin Ice Cream and Pumpkin Ice Cream, that I will get to eventually. This blueberry ice cream is sublimely creamy, rich and not too sweet. Like her previous ice creams I've tried, the one does not freeze hard (because it has alcohol in it) and will melt fast but how in the world could you give it the chance to do that?
 

Makes 1 Quart

1 1-pint box (2 cups) fresh blueberries
1/2 cup granulated sugar
pinch of salt
1 1/2 cups heavy cream
1 1/2 TBS. lemon juice
1 1/2 TBS. kirsch, creme de cassis, or brandy (I used kirsch)

Place the blueberries in a wide saucepan (or frying pan). Add the sugar and stir.

Cover and place over low heat. Cook for 5 minutes to soften the berries and partially melt the sugar.
Uncover the pan, raise the heat to medium and stir until the mixture comes to a boil. Let it boil for 5 minutes, stirring and pressing the berries against the sides of the pan to mash them.
Remove from the heat and transfer to a strainer and bowl. You will need to use a coarse strainer so that you can press the mixture through. Some of the pulp may not go through but press as much as you can into the bowl. Place the pureed berry mixture in the freezer or refrigerator until very cold.

After the mixture is cold, add the salt, cream, lemon juice and kirsch, creme de cassis or brandy.
Return to the freezer or refrigerator to chill again.
Freeze in your ice cream maker following the manufacturer's instructions. (About 25-30 minutes in mine)
Yum! For an extra kick, when serving this, you can pour kirsch, creme de cassis or brandy over each serving.